NOTICE: Infinity N5.2 and N5 FAQ 0.0.0
The wiki has been updated to include the N5.2 changes and the v0.0.0 FAQ.
List of wiki pages updated in N5.2.
Difference between revisions of "Perimeter Weapons"
(Created page with "{{section-ammo-and-weaponry}} {{n4only}} {{n4list}} Within military confines, the term tactical perimeter devices is used for automated zone defense systems. Some examples...") |
m |
||
| (4 intermediate revisions by the same user not shown) | |||
| Line 1: | Line 1: | ||
| − | {{section-ammo-and-weaponry}} | + | {{n5-section-ammo-and-weaponry}} |
| − | |||
| − | |||
Within military confines, the term tactical perimeter devices is used for automated zone defense systems. | Within military confines, the term tactical perimeter devices is used for automated zone defense systems. | ||
| − | Some examples of Perimeter Weapons are CrazyKoalas, MadTraps, | + | Some examples of Perimeter Weapons are CrazyKoalas, MadTraps, [[WildParrot]]s, and all other Weapons or pieces of Equipment with the [[Perimeter]] Trait. |
| − | {{ | + | {{css_skillbox |black| PERIMETER WEAPONS }} |
{{effects}} | {{effects}} | ||
| − | * These weapons | + | * These weapons are placed on the game table using the [[Place Deployable]] Common Skill, applying the Perimeter and Deployable rule. |
| − | * Therefore, when players declare the Place Deployable Common Skill, they place the Perimeter Weapon or piece of Equipment | + | * Therefore, when players declare the Place Deployable Common Skill, they place the Perimeter Weapon or piece of Equipment totally inside the [[Zone of Control]] of the Trooper, instead of placing it in [[Silhouette contact]]. |
| + | {{css_skillbox-end}} | ||
== Perimeter Weapons and the Boost Trait == | == Perimeter Weapons and the Boost Trait == | ||
| − | These devices have been specifically designed to protect the immediate perimeter of their user, and also to detect and/or dissuade intrusion attempts during the user's security duties. | + | These devices have been specifically designed to protect the immediate perimeter of their user, and also to detect and/or dissuade intrusion attempts during the user's security duties. |
In the [[Glossary]] you can consult all the [[Traits]] that indicate how a weapon operates. | In the [[Glossary]] you can consult all the [[Traits]] that indicate how a weapon operates. | ||
| − | {{ | + | {{css_skillbox |black| BOOST }} |
{{effects}} | {{effects}} | ||
| − | * Once the weapon with the | + | * Once the weapon with the Boost Trait is in play on the game table, it is triggered when an enemy Model declares or performs an [[Order]] or [[ARO]] in its [[Zone of Control]]. When triggered, the weapon must move until it enters [[Silhouette contact]] with the enemy Model, and then detonate. The only way to avoid this attack is a successful [[Normal]] [[Dodge]] Roll. Once the weapon has detonated, it is removed from the game. |
* The weapon will not trigger if the path from the weapon to the enemy Model is blocked, for example by an impassable obstacle (for example a wall of infinite height, a closed door or sealed room...) or a gap too small for the Silhouette Template of the weapon to pass through. | * The weapon will not trigger if the path from the weapon to the enemy Model is blocked, for example by an impassable obstacle (for example a wall of infinite height, a closed door or sealed room...) or a gap too small for the Silhouette Template of the weapon to pass through. | ||
| − | * The weapon is not triggered by [[Camouflaged | + | * The weapon is not triggered by [[Camouflaged | Camouflage Markers]] (CAMO), [[Impersonation]] Markers (IMP-1 and IMP-2), or by those Markers who specify so in their description. |
| − | * | + | * Due to the [[Deployable]] Trait, the weapon does not activate other [[Deployable Weapon]]s or Equipment. |
| + | {{css_skillbox-end}} | ||
{{greybox-start | Perimeter, Deployable, and Boost Example }} | {{greybox-start | Perimeter, Deployable, and Boost Example }} | ||
| − | {{image | name=eng-perimeter-1 | + | {{image | name=n5/eng-perimeter-example-1.jpg | style=fullborder }} |
| − | During his Active Turn, a Moran Masai Hunter wants to intimidate | + | During his Active Turn, a Moran Masai Hunter wants to intimidate an enemy Trooper that is clearly out of his range, dissuading him from carrying out an attack. |
| − | To do so, he declares Place Deployable and places his CrazyKoala (Deployable, Perimeter, and Boost) as shown in the picture. He may place it with the enemy Marker inside its Zone of Control because there is also a non-Camouflaged Enemy inside its Zone of Control. | + | To do so, he declares [[Place Deployable]] and places his CrazyKoala ([[Deployable]], [[Perimeter]], and [[Boost]]) as shown in the picture. He may place it with the enemy Marker inside its [[Zone of Control]] because there is also a non-Camouflaged Enemy inside its Zone of Control. |
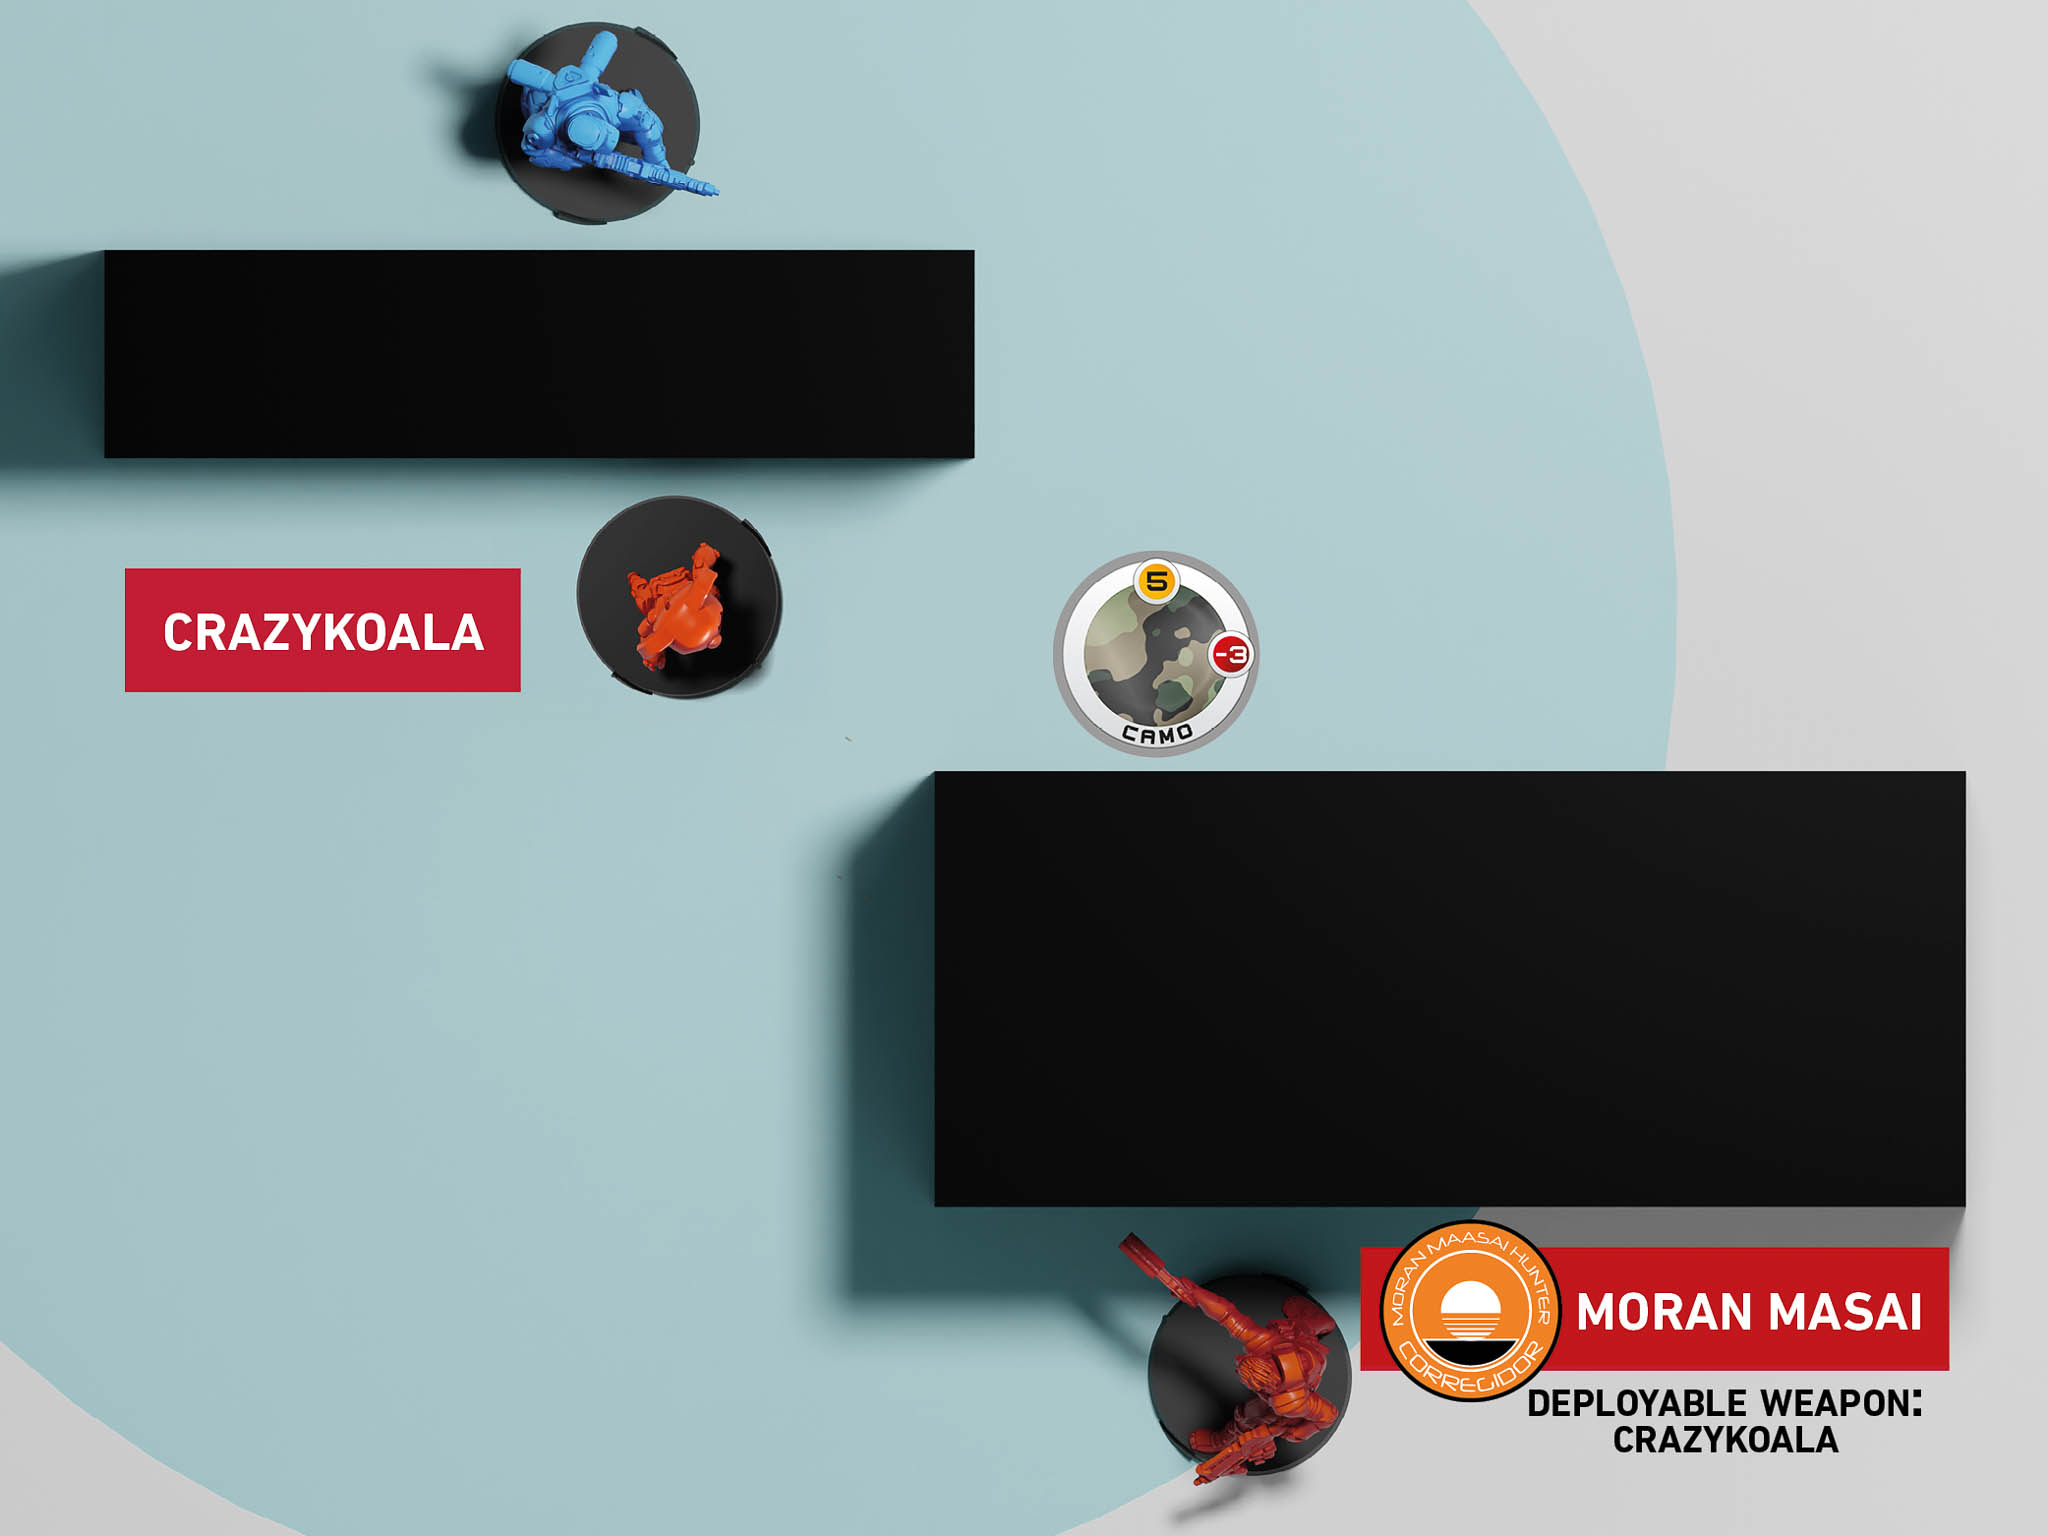
| − | {{image | name=eng-perimeter-2 | + | {{image | name=n5/eng-perimeter-example-2.jpg | style=fullborder }} |
| − | Once placed on the gaming table, when the Order concludes, the CrazyKoala is considered to be in play on the game table. From that moment on, it will perform Boost, detonating against any Enemy Model that declares or performs an Order or ARO within its Zone of Control. | + | {{n5_weapon_single}} |
| + | {{n5_weaponrow|CrazyKoalas| | | | | | | |5|1|SHOCK|ARM|1|[[Disposable (2)]], [[Boost]], [[Perimeter]], [[Deployable]], [*]}} | ||
| + | |} | ||
| + | |||
| + | {| class="n5table-dark | ||
| + | |- | ||
| + | ! Name !! ARM !! BTS !! STR !! S | ||
| + | |- | ||
| + | | CrazyKoala || 0 || 0 || 1 || 1 | ||
| + | |} | ||
| + | |||
| + | Once placed on the gaming table, when the Order concludes, the CrazyKoala is considered to be in play on the game table. From that moment on, it will perform Boost, detonating against any Enemy Model that declares or performs an [[Order]] or [[ARO]] within its Zone of Control. | ||
{{greybox-end}} | {{greybox-end}} | ||
| − | {{ | + | == FAQs == |
| + | |||
| + | {{faqbox | | ||
| + | type = faq | | ||
| + | title = N5 FAQ | | ||
| + | version = 0.0.0, Oct 2025 | | ||
| + | q = Q: Do Troopers with Aerial Special Skill activate Weapons with the Boost Trait? | | ||
| + | a = A: No, as it is not possible to enter [[Silhouette contact]] with Aerial Troopers. | | ||
| + | related = [[Aerial]], [[Perimeter_Weapons | Boost]] }} | ||
| − | {{section-ammo-and-weaponry}} | + | {{n5-section-ammo-and-weaponry}} |
[[Category: Ammunition and Weaponry]] | [[Category: Ammunition and Weaponry]] | ||
| + | |||
| + | <!-- Label and Trait categories. --> | ||
| + | [[Category: Boost ]] | ||
| + | [[Category: Perimeter ]] | ||
| + | [[Category: Deployable ]] | ||
| + | [[Category: Disposable ]] | ||
Latest revision as of 10:19, 30 October 2025
Ammunition || Normal (N) Ammunition | Armor Piercing (AP) Ammunition | Double Action (DA) Ammunition | Eclipse Ammunition | Electromagnetic (E/M) Ammunition | Explosive (EXP) Ammunition | Paralysis (PARA) Ammunition | Shock Ammunition | Smoke Ammunition | Stun Ammunition | T2 Ammunition || Combined Ammunition | Combined Saving Roll || Ammunition Summary Chart
Weaponry | Mixed Weapons || Armed Turret | Chest Mines | D-Charges | Disco Baller | Drop Bears | Mine Dispenser | Mines | Perimeter Weapons | Pitcher | Sepsitor | SymbioBomb | WildParrot || Weapon Chart | Alternative Weapon Chart
Within military confines, the term tactical perimeter devices is used for automated zone defense systems.
Some examples of Perimeter Weapons are CrazyKoalas, MadTraps, WildParrots, and all other Weapons or pieces of Equipment with the Perimeter Trait.
- These weapons are placed on the game table using the Place Deployable Common Skill, applying the Perimeter and Deployable rule.
- Therefore, when players declare the Place Deployable Common Skill, they place the Perimeter Weapon or piece of Equipment totally inside the Zone of Control of the Trooper, instead of placing it in Silhouette contact.
Perimeter Weapons and the Boost Trait
These devices have been specifically designed to protect the immediate perimeter of their user, and also to detect and/or dissuade intrusion attempts during the user's security duties.
In the Glossary you can consult all the Traits that indicate how a weapon operates.
- Once the weapon with the Boost Trait is in play on the game table, it is triggered when an enemy Model declares or performs an Order or ARO in its Zone of Control. When triggered, the weapon must move until it enters Silhouette contact with the enemy Model, and then detonate. The only way to avoid this attack is a successful Normal Dodge Roll. Once the weapon has detonated, it is removed from the game.
- The weapon will not trigger if the path from the weapon to the enemy Model is blocked, for example by an impassable obstacle (for example a wall of infinite height, a closed door or sealed room...) or a gap too small for the Silhouette Template of the weapon to pass through.
- The weapon is not triggered by Camouflage Markers (CAMO), Impersonation Markers (IMP-1 and IMP-2), or by those Markers who specify so in their description.
- Due to the Deployable Trait, the weapon does not activate other Deployable Weapons or Equipment.
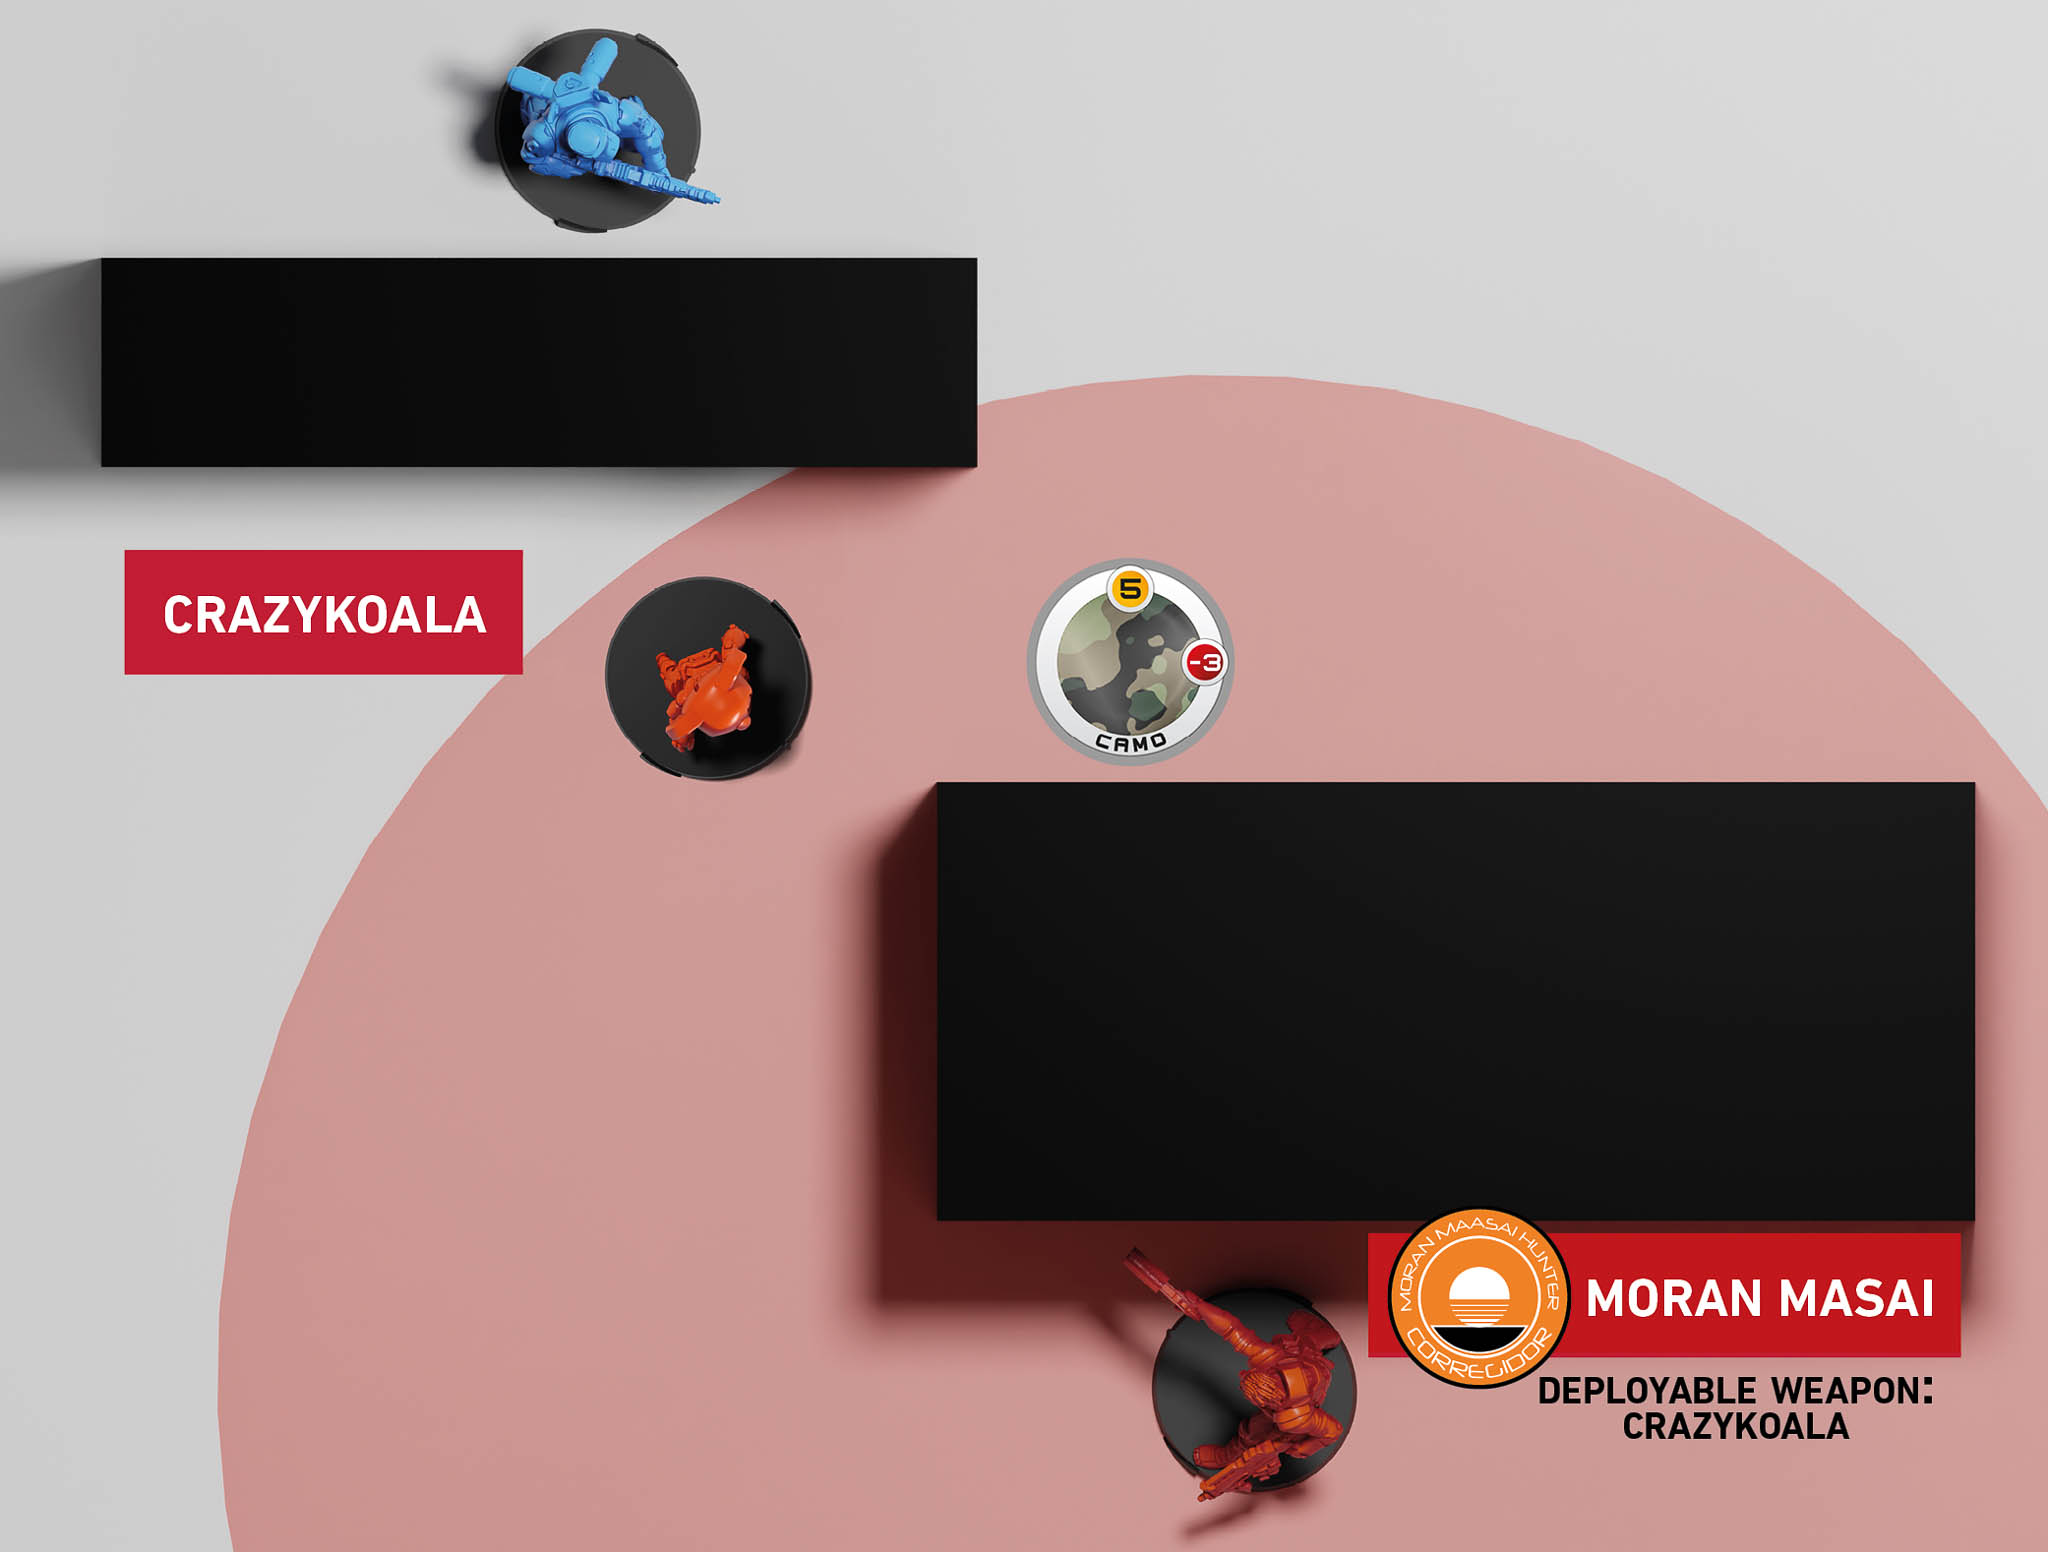
During his Active Turn, a Moran Masai Hunter wants to intimidate an enemy Trooper that is clearly out of his range, dissuading him from carrying out an attack.
To do so, he declares Place Deployable and places his CrazyKoala (Deployable, Perimeter, and Boost) as shown in the picture. He may place it with the enemy Marker inside its Zone of Control because there is also a non-Camouflaged Enemy inside its Zone of Control.
| Name | 8" | 16" | 24" | 32" | 40" | 48" | 96" | PS | B | Ammo | Save Attr. | Save Rolls | Traits |
|---|---|---|---|---|---|---|---|---|---|---|---|---|---|
| CrazyKoalas | 5 | 1 | SHOCK | ARM | 1 | Disposable (2), Boost, Perimeter, Deployable, [*] |
| Name | ARM | BTS | STR | S |
|---|---|---|---|---|
| CrazyKoala | 0 | 0 | 1 | 1 |
Once placed on the gaming table, when the Order concludes, the CrazyKoala is considered to be in play on the game table. From that moment on, it will perform Boost, detonating against any Enemy Model that declares or performs an Order or ARO within its Zone of Control.
FAQs
Q: Do Troopers with Aerial Special Skill activate Weapons with the Boost Trait?
A: No, as it is not possible to enter Silhouette contact with Aerial Troopers.
Related Pages: Aerial, Boost
Ammunition || Normal (N) Ammunition | Armor Piercing (AP) Ammunition | Double Action (DA) Ammunition | Eclipse Ammunition | Electromagnetic (E/M) Ammunition | Explosive (EXP) Ammunition | Paralysis (PARA) Ammunition | Shock Ammunition | Smoke Ammunition | Stun Ammunition | T2 Ammunition || Combined Ammunition | Combined Saving Roll || Ammunition Summary Chart
Weaponry | Mixed Weapons || Armed Turret | Chest Mines | D-Charges | Disco Baller | Drop Bears | Mine Dispenser | Mines | Perimeter Weapons | Pitcher | Sepsitor | SymbioBomb | WildParrot || Weapon Chart | Alternative Weapon Chart