Difference between revisions of "Annihilation"
From Infinity
(Created page with "{{section-scenarios-n4}} {{c1}} If you're playing CodeOne, please see the CodeOne version of this mission! {{c1end}} == Mission Objectives == {|...") |
|||
| Line 14: | Line 14: | ||
| To Kill '''40 to 75''' enemy Army Points. || To Kill '''50 to 100''' enemy Army Points. || To Kill '''65 to 125''' enemy Army Points. || To Kill '''75 to 150''' enemy Army Points. || To Kill '''100 to 200''' enemy Army Points. || 1 Objective Point. | | To Kill '''40 to 75''' enemy Army Points. || To Kill '''50 to 100''' enemy Army Points. || To Kill '''65 to 125''' enemy Army Points. || To Kill '''75 to 150''' enemy Army Points. || To Kill '''100 to 200''' enemy Army Points. || 1 Objective Point. | ||
|- | |- | ||
| − | | To Kill ''' | + | | To Kill '''76 to 125''' enemy Army Points. || To Kill '''101 to 150''' enemy Army Points. || To Kill '''126 to 200''' enemy Army Points. || To Kill '''151 to 250''' enemy Army Points. || To Kill '''201 to 300''' enemy Army Points. || 3 Objective Points. |
|- | |- | ||
| − | | To Kill '''more than | + | | To Kill '''more than 125''' enemy Army Points. || To Kill '''more than 150''' enemy Army Points. || To Kill '''more than 200''' enemy Army Points. || To Kill '''more than 250''' enemy Army Points. || To Kill '''more than 300''' enemy Army Points. || 4 Objective Points. |
|- | |- | ||
| − | | If you have ''' | + | | If you have '''40 to 75''' surviving Victory Points. || If you have '''50 to 100''' surviving Victory Points. || If you have '''65 to 125''' surviving Victory Points. || If you have '''75 to 150''' surviving Victory Points. || If you have '''100 to 200''' surviving Victory Points. || 1 Objective Point. |
|- | |- | ||
| − | | If you have ''' | + | | If you have '''76 to 125''' surviving Victory Points. || If you have '''101 to 150''' surviving Victory Points. || If you have '''126 to 200''' surviving Victory Points. || If you have '''151 to 250''' surviving Victory Points. || If you have '''201 to 300''' surviving Victory Points. || 3 Objective Points. |
|- | |- | ||
| − | | If you have '''more than | + | | If you have '''more than 125''' surviving Victory Points. || If you have '''more than 150''' surviving Victory Points. || If you have '''more than 200''' surviving Victory Points. || If you have '''more than 250''' surviving Victory Points. || If you have '''more than 300''' surviving Victory Points. || 4 Objective Points. |
|- | |- | ||
| colspan="5" | To Kill the enemy Lieutenant. || 2 Objective Points. | | colspan="5" | To Kill the enemy Lieutenant. || 2 Objective Points. | ||
| Line 32: | Line 32: | ||
SIDE A and SIDE B: Both players will deploy on opposite sides of the game table, in Deployment Zones whose size depends on the number of Army Points in the Army Lists. | SIDE A and SIDE B: Both players will deploy on opposite sides of the game table, in Deployment Zones whose size depends on the number of Army Points in the Army Lists. | ||
| − | {| class="wikitable- | + | {| class="wikitable-dark" |
|- | |- | ||
! Side !! Army Points !! SWC !! Game Table Size !! Deployment Zone Sizes | ! Side !! Army Points !! SWC !! Game Table Size !! Deployment Zone Sizes | ||
|- | |- | ||
| − | | A || | + | | A and B || 150 || 3 || 24 in x 32 in || 8 in x 24 in |
|- | |- | ||
| − | | B || | + | | A and B || 200 || 4 || 32 in x 48 in || 12 in x 32 in |
|- | |- | ||
| − | | A || | + | | A and B || 250 || 5 || 32 in x 48 in || 12 in x 32 in |
|- | |- | ||
| − | | B || | + | | A and B || 300 || 6 || 48 in x 48 in || 12 in x 48 in |
|- | |- | ||
| − | | A || | + | | A and B || 400 || 8 || 48 in x 48 in || 12 in x 48 in |
| − | |||
| − | |||
|} | |} | ||
| Line 63: | Line 61: | ||
== Maps == | == Maps == | ||
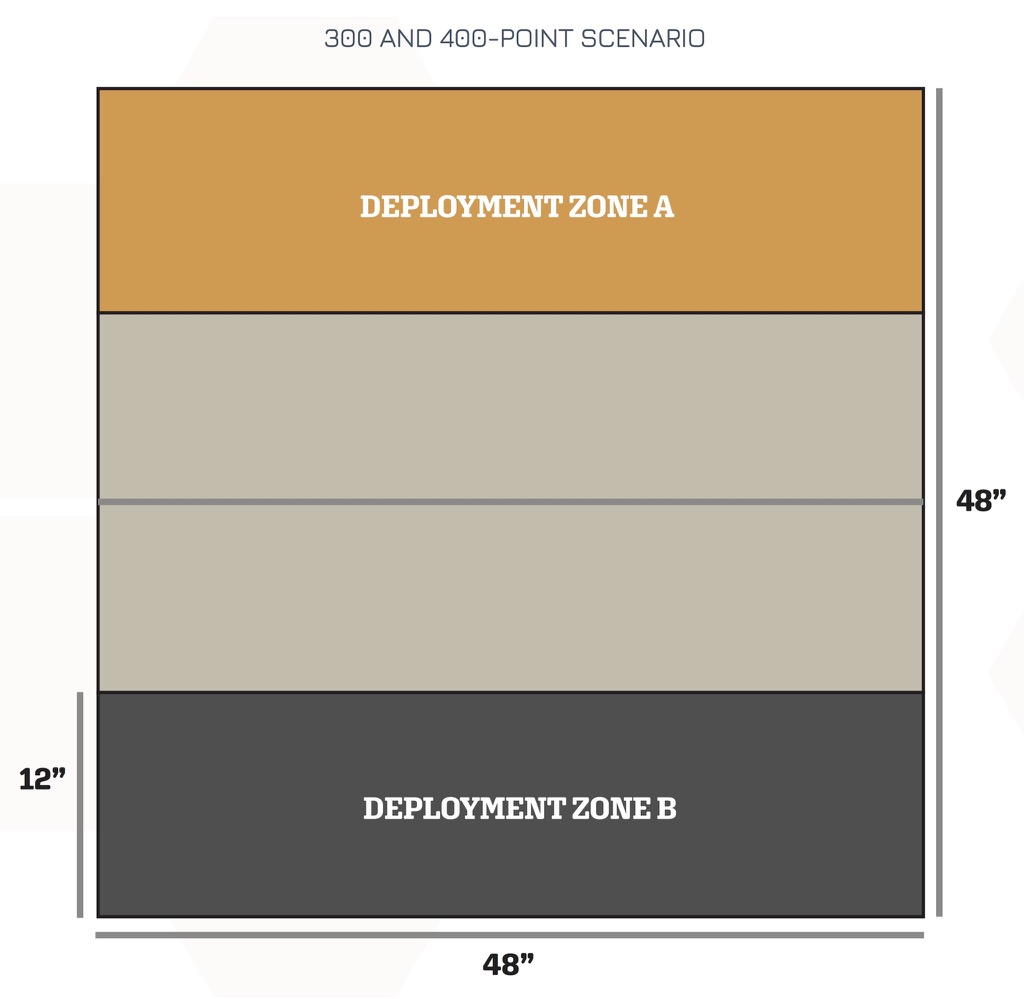
| − | === | + | ===300 and 400 Point Scenario=== |
| − | {{image | name=eng-annihilation- | + | {{image | name=eng-annihilation-map300n400-1024.jpg | style=512 }} |
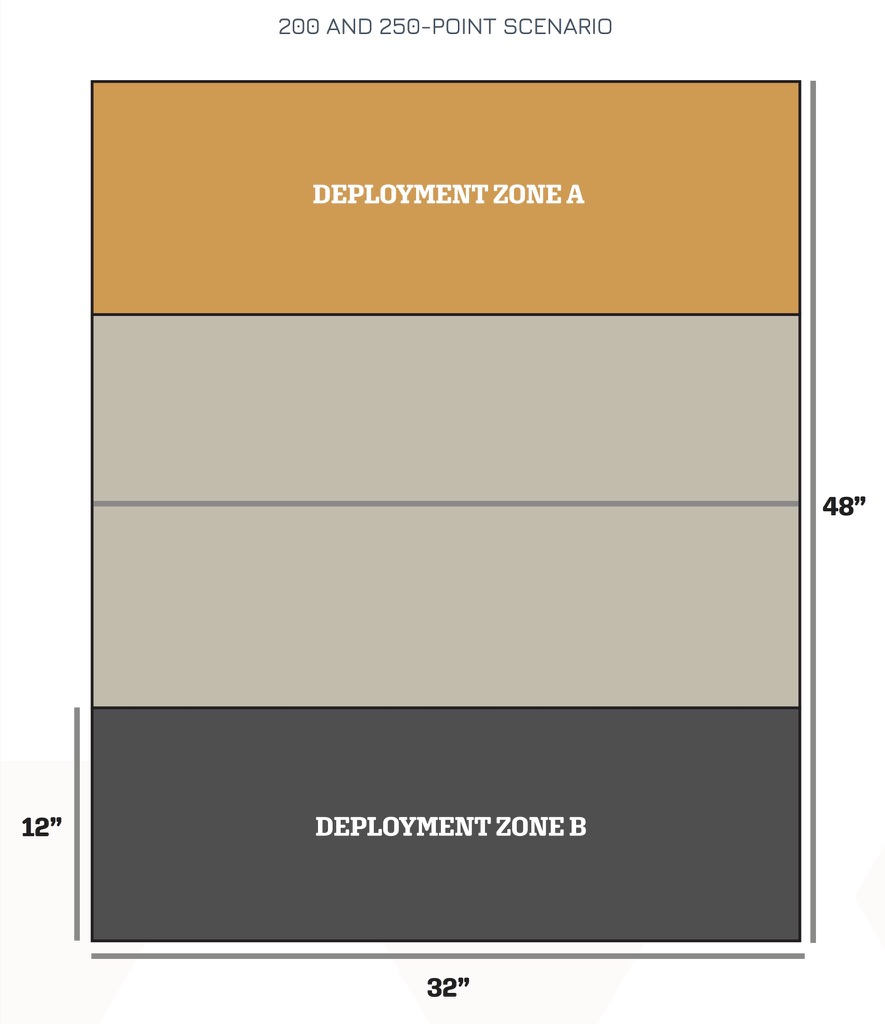
| − | === | + | ===200 and 250 Point Scenario=== |
| − | {{image | name=eng-annihilation- | + | {{image | name=eng-annihilation-map200n250-1024.jpg | style=512 }} |
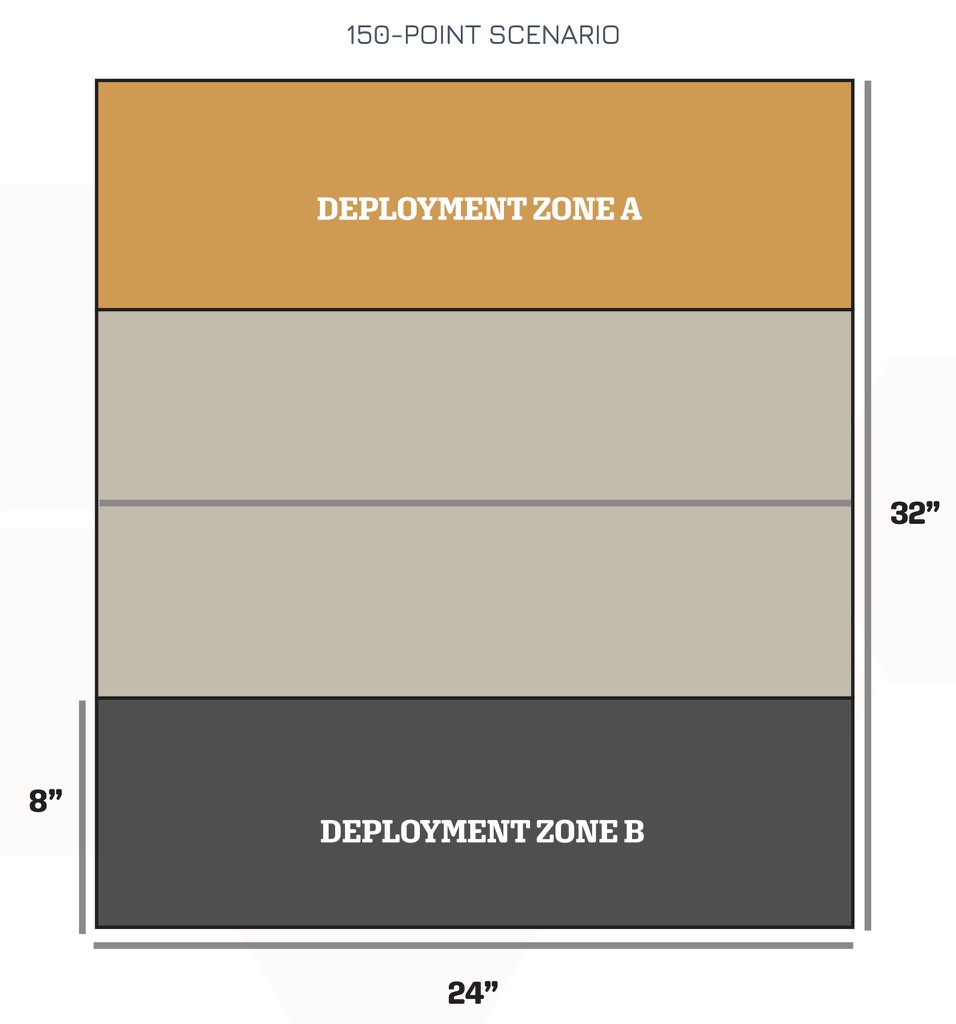
| − | === | + | ===150 Point Scenario=== |
| − | {{image | name=eng-annihilation- | + | {{image | name=eng-annihilation-map150-1024.jpg | style=512 }} |
Revision as of 09:45, 13 October 2020
If you're playing CodeOne, please see the CodeOne version of this mission!
Mission Objectives
| 150-point Game | 200-point Game | 250-point Game | 300-point Game | 400-point Game | Objective Points |
|---|---|---|---|---|---|
| To Kill 40 to 75 enemy Army Points. | To Kill 50 to 100 enemy Army Points. | To Kill 65 to 125 enemy Army Points. | To Kill 75 to 150 enemy Army Points. | To Kill 100 to 200 enemy Army Points. | 1 Objective Point. |
| To Kill 76 to 125 enemy Army Points. | To Kill 101 to 150 enemy Army Points. | To Kill 126 to 200 enemy Army Points. | To Kill 151 to 250 enemy Army Points. | To Kill 201 to 300 enemy Army Points. | 3 Objective Points. |
| To Kill more than 125 enemy Army Points. | To Kill more than 150 enemy Army Points. | To Kill more than 200 enemy Army Points. | To Kill more than 250 enemy Army Points. | To Kill more than 300 enemy Army Points. | 4 Objective Points. |
| If you have 40 to 75 surviving Victory Points. | If you have 50 to 100 surviving Victory Points. | If you have 65 to 125 surviving Victory Points. | If you have 75 to 150 surviving Victory Points. | If you have 100 to 200 surviving Victory Points. | 1 Objective Point. |
| If you have 76 to 125 surviving Victory Points. | If you have 101 to 150 surviving Victory Points. | If you have 126 to 200 surviving Victory Points. | If you have 151 to 250 surviving Victory Points. | If you have 201 to 300 surviving Victory Points. | 3 Objective Points. |
| If you have more than 125 surviving Victory Points. | If you have more than 150 surviving Victory Points. | If you have more than 200 surviving Victory Points. | If you have more than 250 surviving Victory Points. | If you have more than 300 surviving Victory Points. | 4 Objective Points. |
| To Kill the enemy Lieutenant. | 2 Objective Points. | ||||
Forces and Deployment
SIDE A and SIDE B: Both players will deploy on opposite sides of the game table, in Deployment Zones whose size depends on the number of Army Points in the Army Lists.
| Side | Army Points | SWC | Game Table Size | Deployment Zone Sizes |
|---|---|---|---|---|
| A and B | 150 | 3 | 24 in x 32 in | 8 in x 24 in |
| A and B | 200 | 4 | 32 in x 48 in | 12 in x 32 in |
| A and B | 250 | 5 | 32 in x 48 in | 12 in x 32 in |
| A and B | 300 | 6 | 48 in x 48 in | 12 in x 48 in |
| A and B | 400 | 8 | 48 in x 48 in | 12 in x 48 in |
Scenario Special Rules
Killing
Troopers are considered Killed by the adversary when they enter Dead state, or they are in a Null state at the end of the game.
Troopers that have not been deployed on the game table, as a Model or Marker, at the end of the game will be considered to be Killed by the adversary.
End of the Mission
This scenario has a limited time frame, so it will automatically finish at the end of the third Game Round.
Maps
300 and 400 Point Scenario
200 and 250 Point Scenario
150 Point Scenario